CONVERTING FS2004 AIRCRAFT TO FSX TUTORIAL
TABLE OF CONTENTS
Introduction and Downloads
Part 1: Setup
Part 2: Saving and Animating the Props
Part 3: FS2004 Import
Part 4: Setting Up Landing and Taxi Lights
Part 5: Conversion to FSX
Part 6: Editing Materials and Textures
Part 7: VC & Appendix
PART FOUR - SETTING UP THE LANDING AND TAXI LIGHTS
If you originally downloaded the extra definitions file
before 6/12/2019, you must download it again and edit your modeldef.xml
file. You must replace the light_taxi_visible section and add the
special_light section.
We
are ready to set up the landing and taxi lights. Currently this
should be done with the FS2004 model. We will first define the
effect to use at each attachpoint, align them so they shine on the
ground, and then assign a visibility condition to each one.
1.
We can start with the attachpoints. I do not describe
attachpoints other than those used for landing lights and taxi lights,
so if you have any others I can't help much at this time. But
built in nav lights, etc. are handled the same way as described below,
you only need to type in the correct CustomFileName or click the box,
click the ... button, and browse the effects available. Orientation is not important, but Position is.
2. Click the Display Attached Objects
button (image of a paper clip). If present, each attachpoint will
have a little red square in the aircraft display (see below). They
should also have red/blue/green axes extending from them.
3. I find this easier in Wireframe Render Mode, a button in the second row along the top.
4. Click on the Attached Object Editor
button. A list of attachpoints should be in the editor if the plane has landing and/or taxi lights.
5.
Many aircraft (not
all) will have multiple attachpoints for each location. The DC-6B
is a good example of this - there are really only two attached lights
on the plane, a landing light under each wing. But the list shows
there are 8 attachpoints, and it turns out there are 4 under each wing
(only 1 under
each wing will turn yellow, since the others are presumably right
behind it). You can delete the unneeded lights as long as you
know you do not need them, but be careful - you can't really bring them
back without merging them in from a separate model, a much more
difficult process. But if they are right on top of each other I
can't imagine why you would need more than one attachpoint there.
The attachpoints we will be using in the DC-6B example are
attpt_light05 and attpt_light07. In the instructions below I left
the extra attachpoints alone - they don't do any harm, but I usually
delete them for simplicity.
6.
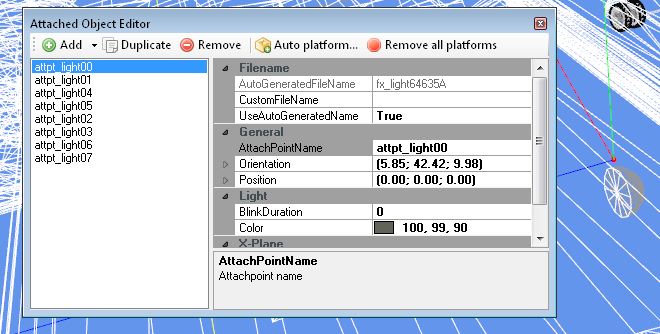
Click the list of attachpoints until you see one turn yellow.
Even if there are duplicates in that spot, we will use the one
that turns yellow to place our light. In the DC-6B the left
landing light attachpoint turns yellow when we click on attpt_light05:
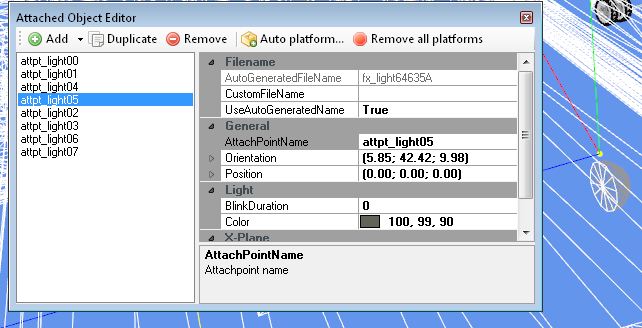
7. In the CustomFileName box, type in fx_landing (you
can't use the ... button because it's not a separate file, it's built
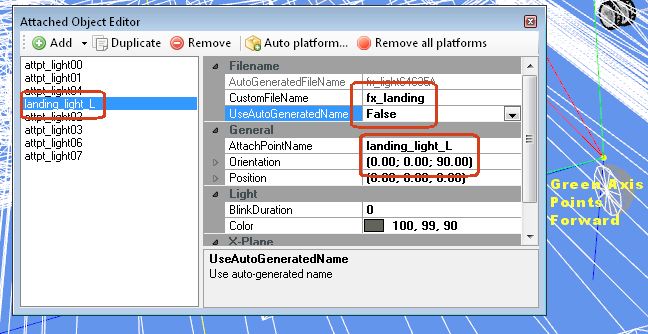
into FS). Set the UseAutoGeneratedName to False. In the AttachPointName box, type in a name like
landing_light_L.
8.
The axes will help us get the light shining in the right
direction. The green axis will point the way the light will shine
- we need it to be pointing forward when it should be shining on the
ground. Click on the Orientation line, drag across it to
highlight the entire line, and type in (0;0;90)
You should include the parentheses. Note the numbers are
separated by semicolons. Click the Position line to see your
changes. If your plane has fixed landing lights then this should
point the green line forward, just what we want (note that any extra
attachpoints may still have the green axes pointing up). Since
the DC-6B has retracting landing lights animated using the water rudder
variable, when the animation slider is at the far right (lights deployed) the green axis
should be pointing forward. When you move the animation slider to
the far left (light retracted), the landing light should rotate and the green line will
be pointing straight down.
9. Do the
same thing for the attachpoint that turns yellow under the right wing. In the case of the DC-6B
that is attpt_light07. Edit the CustomFileName, UseAutoGeneratedName, AttachPointName
(landing_light_R would be logical). In the Orientation: enter (0;0;90)
again and click the Position line. That green axis should be pointing forward when the landing light is deployed.
10.
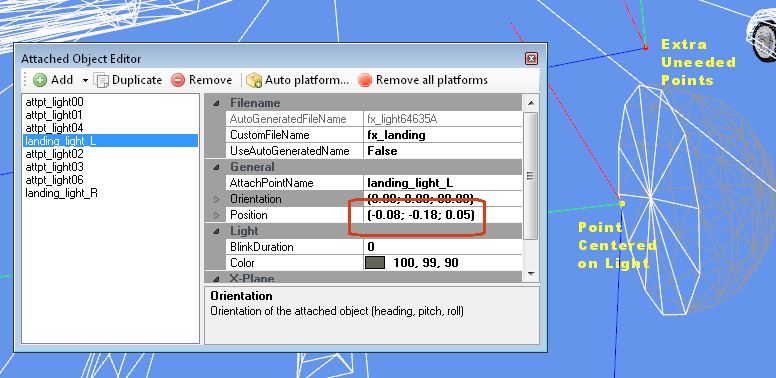
When MCX imports landing or taxi light attachpoints connected to
an animated object, they sometimes will dislocate to the pivot point of
that animation. In this case use the numbers in the Position box
to move them to just in front of the center of the landing light lens.
You can do this too for static lights if they are not quite
right. I find this easier if they are deployed, if animated, so
move the animation slider to that position.
The numbers in the
Position box are Left/Right; Up/Down; Forward/Back. Adjust them
by small numbers at first (by less than 1.0) to see how far they move.
Then adjust them until they are located correctly. In the DC-6B
the left landing light values are -0.08; -0.18; 0.05 and the right is
0.00; -0.16; 0.03. Close the Attached Objects Editor.
11.
Next we need to set their Visibility Condition, so they turn on
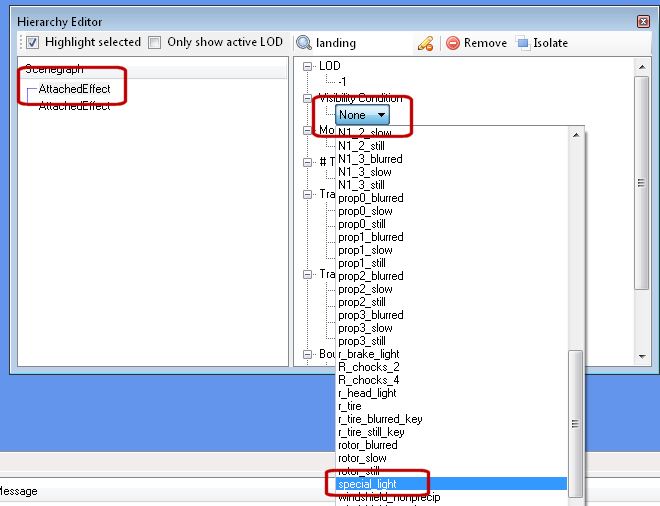
and off with the landing light switch or key (Ctrl-L). Open the Hierarchy editor and type in the word landing.
Your landing lights should be listed. Click on an AttachedLight.
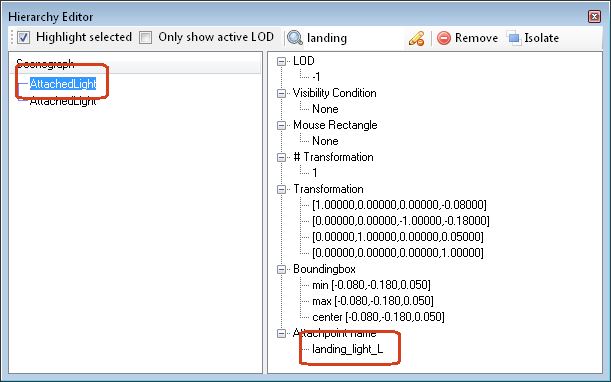
12. A little red square in
the display will turn yellow. Assuming this is a landing light,
change the Visibility Condition from None to special_light.
If you originally downloaded the extra definitions file
before 6/12/2019, you must download it again and edit your modeldef.xml
file. You must replace the light_taxi_visible section and add the
special_light section.
13.
Repeat this process for all landing lights in the list. You can ignore all the extra attachpoints, if any.
SETTING UP TAXI LIGHTS
14.
If some of your attachpoints are taxi lights, it's exactly the
same process in the Attached Object Editor. Give the CustomFileName
fx_landing, set the UseAutoGeneratedName to False, the AttachPointName something like taxi_light_nose, and
type into the Orientation line (0;0;90). Edit the Position line if you wish. Then in the Hierarchy
editor, when you find that AttachedEffect (in our example type taxi into the search box) and it has been selected give
it the Visibility Condition of light_taxi_visible. Now it will
operate by using the taxi light switch (hopefully that plane's panel
has such a switch, because there is no FS keyboard command for the taxi
light). The DC-6B has no taxi lights.
You must immediately continue to Part 5, because you will lose your changes if you do not.
Next: PART FIVE - FSX CONVERSION