Repainting Tutorial Index
Painting the Plane
Creating a Layered PSD
(optional)
|
Repainting Tutorial Index Painting the Plane Creating a Layered PSD |
We're ready to actually start painting the plane. Please note that you should save your PSD file after each of the steps, to avoid losing your work!
Step 1: Painting the Window Stripe:
|
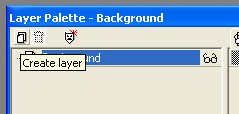
I usually start by painting the window stripe, which then sets the position for all of the other painted items. For this we'll use our layered image, so load the PSD file into PSP. I'll be using the PSD from the DC-6B Paint Kit, which has many layers. Your PSD file may have fewer layers - perhaps just two - Background (or Untitled) and Windows. In our example the PSD file is called dc6bleftfwd_t.psd, found in the texture.myunited folder. We copied that file into that folder in Part 1. We have to create a new layer in this image to place our United paint scheme, so open the Layer Palette, which is usually located in the bottom right corner. If it's not there, click the Toggle Layer Palette button in the top toolbar. Move over the title bar and the window should open up. Click the layer just below where you want the new layer to appear. Since I am repainting a PSD that already contains a National paint scheme, I clicked on the National layer. You should pick a spot between the bare metal on the bottom, and the windows and doors at the top. Press the Create Layer button. Give it the name United Repaint and click OK. You can see in the next image that the layer is now listed there above the National layer. Note that many paint kits do NOT include a National layer! I only clicked on that layer to create the new United layer in the correct place - I do not use that National layer for anything else in this tutorial. If your paint kit already includes a United layer (as mine did), click on an airline layer and then create a new layer called United Repaint (as I did). If your paint kit contains a different airline layer (TWA, etc.) click on that and create the new United layer there. If it contains no airline layer, click the layer just below the Windows and Lines and create the new layer there. The Layer Palette will be used quite a bit in this tutorial. You will be editing only one layer at a time (unless Use Merged Layers is an option for that tool), and the current layer is the highlighted one. Thus we will be working on the United Repaint layer in this texture. The eyeglasses to the right of the name turn the display of the layer on and off. This is handy when you have more than one paint scheme in the same PSD file - turn off the National layer and turn on the United Repaint layer and the image will switch from one airline to the other! The 100 to the right of the eyeglasses is the opacity of the layer. This is used when you have layers like rivets and panel lines that should be very subtle - draw them boldly, and then reduce the opacity of those layers until they are as faint as you want them. This also is used when creating night lighting in a later part I wanted the National layer to disappear, so I clicked that layer's eyeglasses. I also clicked on the United Repaint layer to make it the current layer, so anything I paint will be incorporated into that layer (and not any other layer). This will be one of the most common mistakes you will make - painting while the wrong layer is current! The current layer is also listed in the texture's title bar - get in the habit of checking it often. Don't forget that the Undo button is your best friend (curved left arrow icon) . |
|
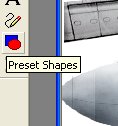
You should have an image that contains little other than bare metal and windows/doors. Now choose the Preset Shapes Tool (blue rectangle and red circle icon). Look at the the PSP window - there should be a box (or just a title bar) that says Tool Options. If it's not there press the Toggle Tool Bar Options button at the top of the screen. Move the mouse over this bar and it will open into a little window. Set it to Rectangle, Line Width 1 and no boxes checked. This will make boxes with the foreground (edging) and background color (central fill). (We will make both foreground and background the same color to create a solid block, but if you make these different colors you can outline your rectangle in the foreground color.) Make the foreground our Custom blue color by clicking the foreground color of the Color Palette (under the word Styles) and clicking our custom blue color from the Custom Colors area. Then click OK. Now choose the same blue for the background color by clicking the color square underneath the foreground color, and selecting the blue color in the same way. Both color boxes will now be blue. |
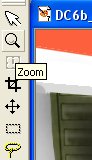 |
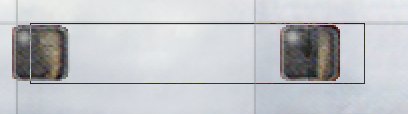
Now let's move in closer to the fuselage windows. Use the Zoom tool for this, or use the mouse wheel to zoom in or out. Click the tool's button (magnifying glass icon), and then left click on a window. You will move closer. Continue to left click on the window until you are at a 2:1 zoom (displayed on the texture's title bar). If you move too close, click the window with the right mouse button. A fast way to get back to normal 1:1 zoom is to use the View/Normal Viewing (1:1) menu item. I've customized my toolbar to add that icon, since it's so handy. You can customize toolbars using the View/Toolbars menu. |
  |
Rechoose the Preset Shapes Tool. Look at your photos, and then create a rectangular color box the width of the window stripe and stretching across several windows by clicking the left mouse button and dragging from corner to corner. When you release the mouse button the area will turn blue. Use the Undo button (curved left arrow icon) if this isn't correct and do it again. |
|
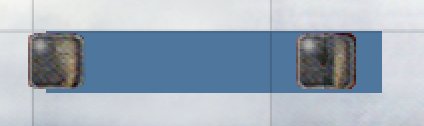
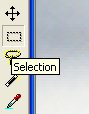
Once you are happy with it, choose the Selection Tool (dotted rectangle) and draw a rectangle around our blue rectangle. You don't need to be accurate (this time), since currently it is the only thing present on the United layer! Choose Edit/Copy and then Edit/Paste as New Selection, and another new blue rectangle will appear. Move this into position to the right or left of our original. Click it to anchor it. Now the stripe is twice as long. Choose Edit/Paste as New Selection again, move into position, and click - the stripe is now three times as long. You can also make a selection rectangle around the new longer stripe and then copy and paste that - you will get done faster. Since you will be using these two commands a lot, you might want to learn the keyboard shortcut for these - Edit/Copy is Ctrl C, while Edit/Paste as New Selection is Ctrl E. Continue this process until you have the entire window stripe completed. Finish by choosing Selections/Select None to get rid of the selection dotted line. This is another very good command to add to the main toolbar - you will be using it often. Save your PSD file. |
Step 2: Checking our Texture on the Airplane in FS
We'll check our new blue stripe texture on the airplane to confirm it's the correct color and size. You may do this step as often or as little as you feel you need to. I do it after each time consuming step to check that it is perfect, so I don't have to go back to it later.
 |
Make sure that nothing in the image is selected. Choose Edit/Copy Merged. This will combine all visible layers and copy the image to the clipboard. Choose Edit/Paste/As New Image. The entire PSD image should now appear in the new file's window. Choose File/Save. If it says it will become a merged image, click OK. Browse to your plane's texture folder and in the drop down box choose BMP as your file type. Then type in the original name of your texture file, with _working added at the end. For this example, I would save my image as dc6b_leftfwd_t_working.bmp. This is a temporary file and can be overwritten each time you want to see your edited texture in FS. |
 |
Start DXTBmp and choose File/Open to load our new working BMP image we just created. Scroll down the displayed image if necessary and check that you have the right BMP file. |
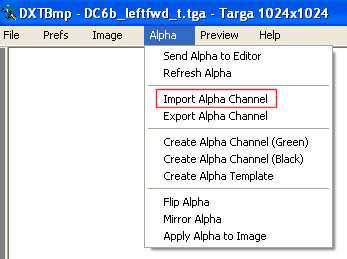 |
If you have an alpha channel that you created earlier, choose Alpha/Import Alpha Channel. Click OK at the warning message. Browse to your plane's texture folder (if necessary) and select the _alpha image. You should see it appear in the box in the upper right. If you don't have one yet, you can skip this step for now. Don't forget to do this step later, once you have created one in Part 3. Now choose File/Save as/Extended Bitmap. In the drop down box choose DXT3. Click on your original bmp file. In our case that is dc6bleftfwd_t.bmp. Now click OK. Say Yes when asked if you want to overwrite the file. Warning! Make sure that you are saving the file into the new plane's TEXTURE folder or you will be overwriting another plane's texture, and be sure you have the right file name or you will be overwriting another texture!! In our case this is the texture.myunited folder. |
 |
Now start FS and load the plane. If you already have FS running with the new plane loaded, you need to reload the textures instead. FS2002: Choose World/Scenery Library. Click OK. FS2004: Choose Options/Display/Hardware and slide the Global Texture Size slider (at the bottom) one notch left or right. Click OK. For best viewing, go back and change it to Massive if not there already. Now you will see your new texture on the plane. Cool! Make sure that the stripe is at the right position and is the right color in the sim - sometimes some errors will become more obvious when looking at the texture on the airplane. Repeat this step whenever you need (or want!) to see the texture on the airplane. |
Step 3: Painting the Yellow Stripe
|
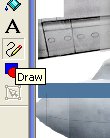
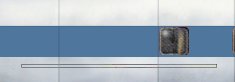
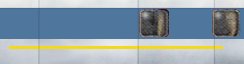
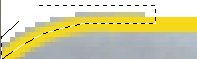
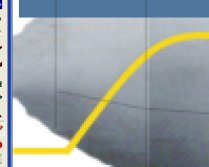
We'll do the yellow pinstripe next, which forms the bottom stripe. There will be white between the blue window stripe and the yellow pinstripe. Hey, why don't we do the white stripe next? It's faster to do the yellow first, that's why. We'll create the yellow stripe first, and just fill the space between the blue and the yellow with white later. For this we'll use the Draw Tool, which might better be called (for our use) the Line Tool (icon of a pencil drawing a line). In Tool Options set Single Line, width 3, and a simple solid line. Uncheck the Antialias box if desired (gives a sharper line for pure horizontal or vertical lines). Select a nice yellow color for the foreground color, or create your own custom color. I used RGB color values 245, 217, 25, a rich gold color. Now use the mouse to left click and drag the mouse along the path where where the line should be. Get it exactly level! It doesn't have to extend across the entire fuselage. When you let go of the mouse it will turn yellow. Is it too high or low? Choose the Selection tool and drag a rectangle around the yellow line (avoiding the blue stripe). Then drag the yellow line to where you want it. To create more yellow line, choose the Selection Tool and drag a rectangle around the yellow stripe (avoiding the blue line) and then choose Edit/Copy and Edit/Paste as New Selection (called copy and paste from now on), and move the new segment next to the original. Continue until the yellow line is all the way across, except for the nose area where the yellow line dives down. Finish by using Selections/Select None to get rid of the selection dotted line. |
 |
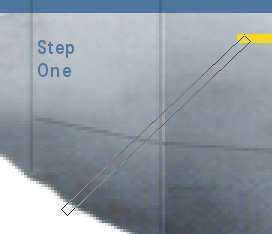
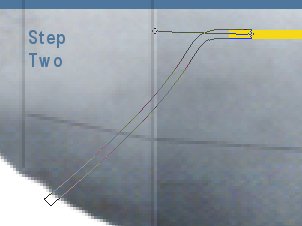
Now we have to paint the curved yellow line at the nose. This is done using the Draw Tool again, but this time set the Tool Options to Bezier Curve, width 3, and check the Antialias box. What's that? Curved and diagonal lines are much improved by a technique called antialiasing. This effect will blend pixels of different colors to reduce the "jaggies" of these lines. This tool can do two things - first it can draw a curved line (what we want) with the foreground color, and fill in the inside of the curve with the background color (which we don't want). So, we need to set the background color to null. To do this, click the little black triangle on the background color of the Color Palette, and choose the Null button (slashed circle icon). Our foreground color should already be set to yellow. Note: to get a background color again, click the black triangle and select the paint brush icon. |
|
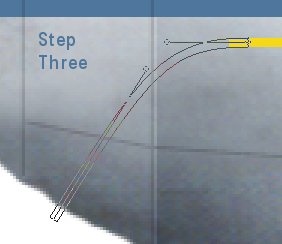
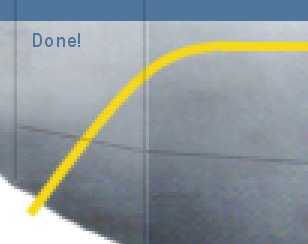
The Bezier Curve tool requires three actions to produce a curved line. First you draw a straight line (as we did above) from the start to finish points. Then you click and drag near the start of the line to determine both the starting angle and the inital curve. The farther you move away from the start point the longer this initial curve will affect the line. The final action is to click and drag near the end of the line, to determine the same things as the second action does for the start of the line. When you let go of the mouse in Step 3 the yellow line will appear. See the images for details. If you don't like the shape of the curve, press the Undo button on the top toolbar (curved left arrow icon) and try it again. Save your PSD file. |
Step 4: Filling with White:
 |
We are going to use the Flood Fill Tool (dripping Paint Bucket icon) to fill the area between the blue and yellow with white. But the white must be contained between color stripes. We still have a gap in the yellow line. Create a Single Line from the current end of the stripe to the edge of the texture (see image). Note that the blue stripe in this image doesn't reach to the edge of the texture - copy and paste a chunk of blue stripe to extend it right to the edge. Finish with Selections/Select None. |
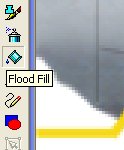 |
Now select the Flood Fill Tool, and select white as our foreground color. Many use an off white (220, 220, 220 is a good gray), or you can use a yellowish white with good effect. Others (like me) just use 255, 255, 255 on the Basic Colors section. In Tool Options set the Tolerance at 10, Opacity 100, Blend Normal, and Match RGB Value.
|
|
Now left click in between the blue and yellow stripes - the space should fill with white. If there is a problem, use the Undo button on the top toolbar. Check the entire texture to make sure no white has escaped! If you look carefully at the area between the curved yellow stripe and the white, you will see gray pixels. These are pixels left over from when the yellow stripe was antialiased to the gray background that existed before we filled with white. We need to remove these gray pixels and get a properly antialiased yellow line against the new white background. One way is to do it pixel by pixel, which is easiest for short curved lines. Choose the Paint Brush Tool, and in Tool Options set to Shape Round, Size 1, Hardness 0, Opacity 100. Foreground color should still be white. Now left drag the mouse along these gray pixels, removing any that are not the nice bright yellow color. Do not go more than halfway into the stripe width, or you will affect the yellow/gray antialiasing on the other side of the yellow stripe! A better way for long curved lines is to use the Freehand selection tool. In the Tool Properties select Point to Point, Feather 0, and uncheck the Antialias box. Start by clicking in the middle of the yellow line at the bottom end of the curve, and then move up the yellow stripe a bit and click in the middle again. Continue clicking on the yellow curve, staying in the middle. When at the other end of the curve, move up into the white area and then move around back to your starting point (see image). Finally, double click to establish the selection. Now choose the Flood Fill Tool, and in Tool Options set the Tolerance to 200. This will allow any color to be covered, within the current selection. Set the foreground color to white and click inside the selection. All of the gray pixels have been converted to white, just like when we did it pixel by pixel above. Before you forget, go back into Tool Options and set the Tolerance back to 10 to avoid nasty surprises later! Now reselect the yellow color as the foreground color and Null as the background color, and the Bezier Curve tool. Make the yellow stripe again, exactly as you did before. Lay the new line exactly over the top of the old one. This will create the proper antialiasing between the yellow line and the white area. Save your PSD file. |
Step 5: Creating the White Top and Black Nose Glare Paint
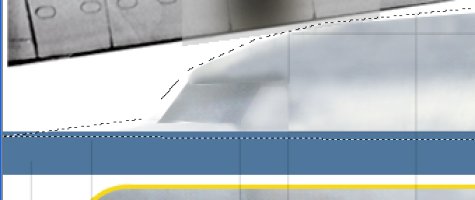  |
We need to create the white top of the fuselage. We will create this by using the flood fill, but we need to limit the fill to the fuselage area, so it won't fill the wings. For this choose the Freehand Tool. Click at the left edge of the blue stripe, and click up along the top edge of the nose. Keep clicking along the top edge of the fuselage to the right edge of the fuselage, and then down until you are at the right edge of the blue stripe. Now double click and the entire top fuselage will be selected. Fill this with white using the Flood Fill tool, clicking inside the selection but above the blue stripe. Finish by choosing Selections/Select None. |
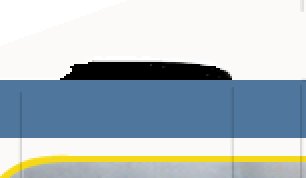 |
Finally for the black glare shield. This usually has to tweaked once you see it on the model, so this is a "trial and error" kind of process. Use the Paint Brush Tool to paint black pixels onto the top of the nose. Check it on the airplane, and then adjust the pixels until they are correct. Some paint kit PSD's include a "Template" layer which gives the outline of the plane itself - this can help quite a bit. When happy with it, create a curved black line across the top using the Bezier Curve Tool with black as foreground and background colors. This will smooth the upper edge of the glare shield. Save your PSD file. |
Let's move on to Part 3- Adding the Lettering and Logos